Lightweight Tramping in New Zealand
Working for myself comes with benefits that I occasionally need to remind myself of. The other day I had to jog my memory when I noticed a weekend tramping trip wasn’t an option, but that a quick mid-week getaway was available to those of us with a flexible schedule. Yay!
As I gathered my gear, I mentally reviewed the changes I had made to my tramping kit over the past year. My goal was to reduce neck and back pain that had been plaguing me for many moons. I have been reviewing these changes over a few trips, going through various iterations of equipment that brought me ever closer to my dream setup.

While the overarching goal was weight reduction (of the pack, not its mule), I actually increased the weight of comfort items like a sleeping pad, also adding a camping chair. During this process I took a lot of inspiration from ultralight principles, but without going to the extreme of cutting off my toothbrush handle. The resulting loadout is tailored to suit my most common type of trip: A single overnighter in low alpine terrain covering 3.5 seasons. I have also learned to embrace some of my more idiosyncratic needs to keep my brain happy, but more about that later.
Weight Reduction
My new kit is by no means ultralight, but it has come very close. The ultralight adage that not bringing items is the cheapest way to reduce weight guided a lot of my decisions. Every item in my pack was evaluated, and either removed, replaced, or, in rare circumstances, kept as-is. Save 30 grams on an already quite light titanium pot? Bring it on! Leave the Kindle at home and use a phone + ultralight battery pack instead? Sure! Drop 150 grams on a rain jacket? Absolutely!

Taken by themselves, each of these changes will have your tramping friends laugh you off the mountain. But apply them to dozens of items, and suddenly your base weight is 30-40% lower than before. The effect of carrying less weight is drastic!
The dark side of these changes lies in their cost. A lot of items can only be sourced from cottage companies overseas. By the time they arrive in New Zealand, the are expensive. When I started going for the low-hanging fruit, each gram saved cost me roughly one NZD. These days I’m closer to $2/g. That’s ouch, but I’d rather buy new gear than giving the money to my physiotherapist.
The number of changes I made could fill a book, so I’ll discuss only a few noteworthy items below.
Sleep System
My ideal sleep temperature range is quite narrow, and after 20 years in sleeping bags I decided to give quilts a chance. Not only does my Enlightened Equipment Revelation quilt allow me to pop out a leg to cool down when set up as a blanket, it also zips up the footbox in colder nights. As a nice extra it can be turned into a poncho, which is great on a cold morning. I have used the -6C version down to -4C on this trip, and could not have been happier with it. It’s also stupidly light and can be customised for warmth, length, width and colours.

After using Therm-A-Rest sleeping pads for almost twenty years, I finally started looking for alternatives. I was extremely happy with the weight and warmth of my X-Therm pad, but due to its relatively hard horizontal baffling system I never slept on it particularly well. I have since tried various pads to address this issue, and have landed on a Big Agnes Rapide SL pad for now. It is significantly more comfortable than the X-Therm, at the expense of being slightly heavier and colder. I was happy with it at -4C, but I would not use it when camping on snow.
Another addition to my sleeping kit is an inflatable pillow. My Hikenture pillow will not break any weight records, but it is an incredibly comfortable pillow for side-sleepers. Using a stuff-sack full of clothes does not even begin to compare. Why did I torture my poor neck for so long?

Between sleeping much better, having less weight to carry, and having a way to relax comfortably in my Helinox Chair Zero during breaks and in the evening, my body has never been happier during or after a walk. I used to be in pain for days, and sometimes weeks, when coming back from a tramp, thanks to lifelong back issues. The improvements to my wellbeing have been significant, and pain does not factor into trip decisions any more.
Other Changes
While I was reviewing my kit, I started challenging a few other assumption and habits. I have always struggled a lot more than the average person with the feeling of cold sweat and sunscreen on my skin. For the last few trips I tried Brynje mesh undershirts, that were originally designed for moisture management in cold conditions. I have a summer and a winter shirts, and they have served me well on hot summer days as well as temperatures just above freezing. As a bonus, the looks of a 90s rave outfit will serve to amuse your tramping buddies.

I combined this with a sun hoodie – a thin, long-sleeved polypropylene shirt with an integrated hood. This combination keeps me dry and out of the sun, and has been a huge improvement in warm and cold conditions. Are you familiar with that feeling of being clammy with sweat and starting to shiver when the wind suddenly picks up? Doesn’t happen to me any more! I also don’t feel sticky any more, since I only need sunscreen on my lower face.
During my long hours of research, I noticed that there had been another shift in culture in regards to footwear. When I picked up tramping, boots were the gold standard for mountain footwear. Recently, I noticed that people who dropped pack weight also switched over to trail running shoes. I gave this a shot as well, and found it enormously liberating. My feet feel much better at the end of the day, as long as I do not take them too far off the beaten track. On rocks or tussock-covered tops with ankle-rolling holes they seem a little more accident prone than their clunky ancestors. A few weeks ago I painfully rolled my ankle in a dried out riverbed. I’m also more likely to knock my ankles into rocks. On high alpine terrain or snow I will likely revert back to boots.

Another issue that has been nagging at me for a while is the one way in which I violate the “leave only footprints” policy: What to do with used toilet paper when nature calls? Last year I 3d-printed a travel bidet that screws onto my “dirty” bottle. Its first use was a worst case scenario in high winds on an alpine ridge. At four in the morning! All went well, though, and I haven’t looked back. Not only is this approach better for the environment, it is also a lot cleaner than the alternative. If you are interested in the messy logistics, there are dozens of videos on Youtube that take you through the process.
Numbers
As I mentioned before, my gear would not be considered ultralight in the strictest sense of the word. The community that sets the standards is mostly active in the United States, and I doubt that an ultralight setup designed for summer on-trail hiking in the continental US would keep you particularly warm or safe in alpine New Zealand.

In saying that, I have certainly taken inspiration from the ultralight philosophy, while putting my own spin on it. Finding the sweet spot between ease of walking and being pain-free, while also staying safe and happy is a calculation as individual as your goals.
For what it’s worth, my base-weight on a 3-season one-nighter above the treeline, without camera gear or consumables, currently sits at 7.6kg. With consumables for two days and one night, including 1L of water, I’m at 9.7kg. I carry more photography equipment than most people, which brings the total up to 11.7kg. This saves about 4-5kg compared to a few years ago, and feels like I’m wearing a day pack.

One indulgence I’m sticking to is my Aarn Pack. I could easily save another 1kg by choosing an ultralight pack, but my Aarn Featherlight Freedom Pro is just too damn comfortable and convenient. I’m convinced that 12kg with a perfect carrying system are much easier on my body than 11kg in an ultralight pack without proper support. Dear ultralighters, that’s a hill I’m willing to die on!
The Trip
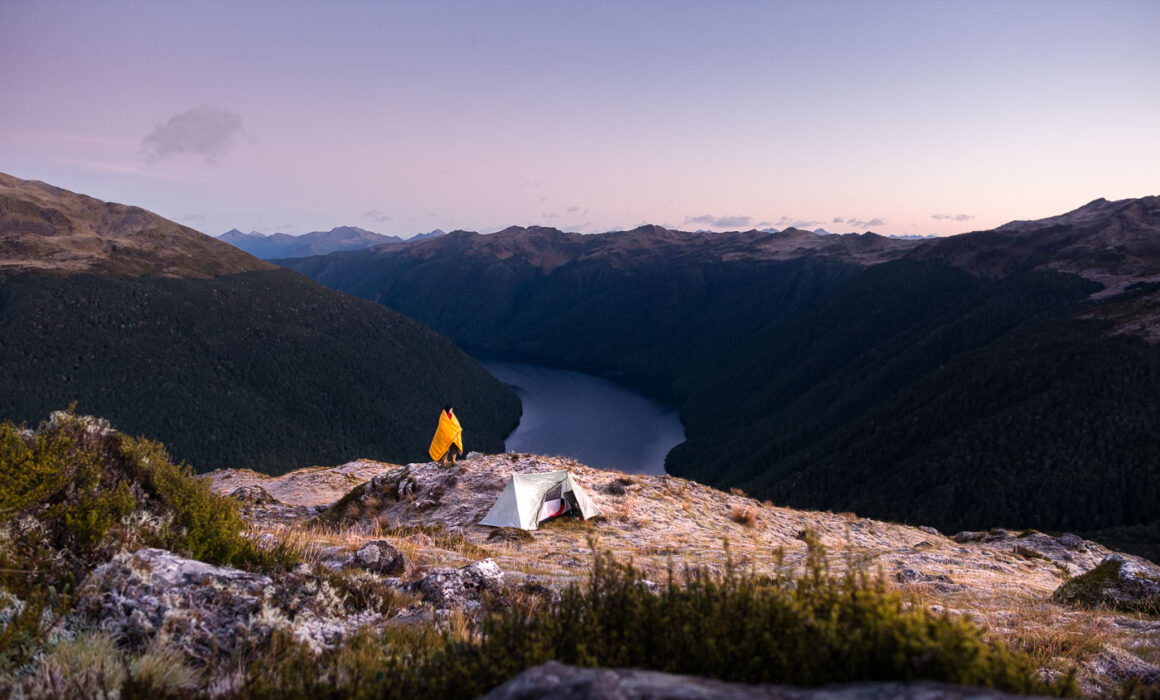
It’s easy to get carried away with all the shiny equipment, but at the end of the day it’s all in service of having a good time in the outdoors. For my little mid-week adventure, I jumped into my car to Lewis Pass, where I walked a variation of the Rough Creek track to Lake Christabel Hut. After crossing the saddle, I followed the track down until it re-enters the treeline. Instead of dipping back into the bush, I kept going south on the ridgeline to a hill with the prosaic moniker Pt 1293. Let’s just call it Mount Christabel for now.

Mount Christabel provides breathtaking views across the lake and its surrounding ranges. It took me about four hours on the way in, and a little over three hours on the way out (without breaks). A sprinkle of tarns covers Mount Christabel, and no matter where you camp, you are never more than a hundred metres away from one. Just make sure to filter your water, since the tarns are all stagnant.
The night was surprisingly still for such an exposed location, which resulted in a huge amount of frozen condensation on both sides of my tent fly. The night sky was amazing, though, and I was well rested for the return journey. With a low pressure system on my heels I made it back to the car in one piece.

Camera Gear
Camera: Fujifilm X-T5
Lens: Fujifilm XF16-55
Tripod: Explorer GX-PROK
Remotes: Yongnuo RF-603CII

Disclaimer: I don’t have a relationship with the brands mentioned in this article, with exception of Aarn Packs and Fujifilm, who I have worked with for a number of years.


